Wednesday, 11 May 2011

The Frame. Exercise 2: Object in different positions in the frame

I spent a lot of time thinking about a suitable subject for this series of shots. I tried a couple of scenarios but they didn't have the desired effect.  For example, a swan in the water.  It was very difficult to place a moving object in differing places in the frame, especially when the moving object started to hiss at me!  I found an old boat along the canal which I used for this exercise.  The setting is pretty even with the canal water in the foreground and the greenery of the trees in teh background.

Boat right in the centre of the frame
I think this has the least appeal to me as it doesn't look like there is much happening in the picture.


Boat off centre
I think this works better as it leads you eye into the frame.


Boat in top right hand corner
I like this shot as it is something I would rarely try myself.  I like the way the water leads you into the boat and its reflection in the water.  It also makes the boat look more distant from this perspective.


Boat in bottom left hand corner
This is how I would usually try and frame a shot like this. 

I usually try to place my subjects lower in the frame however from this exercise I have discovered that changing the position of the subject in the frame can give you different perspectives. 

I have also noticed that in this situation the shots with the boat at the centre horizontally are not as interesting to look at.

Wednesday, 4 May 2011

The Frame. Exercise 1: Fitting the frame to the subject

I have always liked the water tower where I live so I decided to shoot it for this series of photographs. 

I used my 18-105mm lens. 

Conventional viewpoint
1/320s f14 21mm

All the water tower is in the frame with some of the houses in the background visible.


Tight fit
1/250s f14 28mm

The water tower fills the frame with some sky in the background.
This is at tight as I could frame the tower without losing some of the top or the bottom.


No edges showing
1/320s f14 42mm

A close up of the tower itself and the words Enfield Island Village can be read.  The blacked out windows show that it is the corner of the building.

This would be the type of shot I would probably have gone for originally.


The water tower in its surroundings
1/320s f14 18mm

This shot shows the size of the water tower in relation to the houses beside it and the road that surrounds it.

I don't think the road signs are particularly attractive in this image and because I was on a bridge to take the shot the water tower is leaning to one side. 


Crops of the final image


Exercise 5: Panning with different shutter speeds

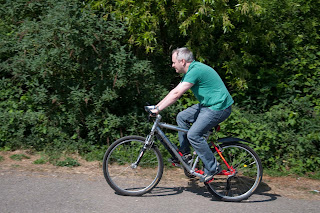
I used my cyclist volunteer for this exercise too.  This is the first time I had given panning a try and I was surprised with the results escpecially when I compared them to those taken with different shutter speeds.

I took my camera off the tripod for this series of shots.  I used my 18-105mm lens.

1/320s f7.1 40mm
The background is still sharp at this shutter speed


1/125s f11 40mm
The background is slightly blurry


1/80s f13 40mm
The background is getting more blurred and the feet are slightly out of focus


1/50s f18 40mm
I like the background in this shot it gives a sense of movement to the subject


1/30s f22 40mm
There's a greater sense of movement in this image and the feet are also very blurred


1/15s f29 40mm
The subject in this image is not so sharp - the legs look like they are moving very fast. The subject looks like he's cycling at great speed when there is no change to his pace.


1/5s f29 40mm
The subject is very out of focus in this shot but it increases the sense of speed he cycling at.

Panning is a good way to show movement by keeping the subject in focus and making the background blurred.  It gives a better sense of movement and speed than slowing the shutter speed and keeping the camera still. 

Having the subject out of focus can add to the image and the movement however I think you have to be careful to get the focus and lack of sharpness just right. 


Exercise 4: Shutter Speeds

I took a series of photgraphs of my volunteer on his bike for this exercise.  I put my camera on the tripod and used my 18-105mm lens.  Getting a plain background was a little problematic as I live in London.  However, I found an area in Gunpowder Park in Enfield which I felt was suitable with just some trees in the background.  

1/800s f6.3 40mm
The image is quite sharp and movement looks static


1/400s f9 40mm
Subject starting to blur


1/200s f13 40mm
Subject is pretty blurred and the background is still sharp

 
1/100s f18 40mm
Subject is very blurred and it looks like a badly taken photograph


1/25s f18 40mm
Here the subject is very blurred but there is a sense of motion in the shot


1/13s f25 40mm
In this shot the subject appears to be cycling at great speed leaving a ghost-like trail


Lessons learned:
  • The slowest shutter speed I used where motion was still reasonably sharp was 1/800s.  If you want to freeze the subject you would want to use a much higher shutter speed than this. 1/3000s for example. This may vary though depending on the motion you are capturing eg someone walking would be slower than cycling.
  • The longer the shutter was open I ran the risk of over-exposing the shots.  I did shoot on a very bright day and perhaps an ND filter would have helped get longer exposures.
  • Images with a little blur don't look as impressive as those that are very blurry.  There is less motion/action in them.
  • I prefer the effect of slower shutter speeds on movement.

Sunday, 1 May 2011

Exercise 3: Focus at different apertures

I found getting a suitable subject for this exercise difficult.  I tried a row of houses, railings and a fence but changes to the depth of field were not visible.  In the end I lined up a row of jars and food cans to see if I could get a result. 
The pictures below were taken at 35mm using a 18-105mm lens at apertures f4.5,f14 and f29.  The focal point was the can of vegetable curry in the middle of the line up.


Aperture f4.5
The sharpness in this shot is primarily around the can of vegetable curry with the jar and can on either side slightly blurred. 
The front can is out of focus as is the last jar in the series.
Depth of field is shallow.

Aperture f29
The line of cans in this shot are sharper from beginning to end and there is a stronger depth of field


Aperture f14
There is only a slight difference between this and f29.  The front and rear are more focussed than f4.5 and there is a greater depth of field. 

Thursday, 28 April 2011

Stacy Pearsall - Combat Camera

Came across this interesting blog by Stacy Pearsall today courtesy of Scott Kelby.  I thought distance learning was a challenge but Stacy has made my recent decision to do a BA with the OCA look easy! 

I never heard of Combat Camera before and it certainly isn't for the faint hearted.  We all face challenges in our work and know the difficulties getting that 'shot' entail.  I find Stacy's work impressive especially when I consider the dangers and obstacles she faced. 

I particularly like the portrait shots.

Exercise 2: Focus at a set aperture

For this exercise I decided to use some decorative balls made out of dried plants and natural fibres from my living room.  I like the texture and ruggedness of these.  I lined the balls up with the smallest one in front to create some depth and then positioned myself and an angle so all three could be easily viewed.
Each shot was taken with an aperture of f5.3 at 75mm using my 18-105mm lens.  I prefer the shot where the focus is in the front plane as it draws you into the image giving you a sense of movement and greater depth.  Focus on the rear plane is my least favourite as I find the blurriness in the front distracting and unpleasing to the eye. 
Front focus


Mid focal point


Rear focus