Wednesday, 30 November 2011

Artificial light - available light

Up until now, I have always used daylight in my photography.  I suppose one of the reasons for this is because it is easier to use and free.  However, I knew that the time would come where I would be forced out of my comfort zone and I would have to tackle the world of artificial lighting. 


Tackling manual exposure for the Colour part of this course greatly enhanced my ability to take more interesting pictures.  With this in mind I am hoping that coming to grips with artificial lighting will extend the range of my photography and present me with some fresh challenges. 


To help with this part of the course, I have been reading Understanding Flash Photography by Bryan Peterson and also Light: Science and Magic.  An introduction to Photographic Lighting.  I must admit I have been amazed at how it is actually easier to use the flash manually than TTL.  I will cover more about that in another post. 

There are 2 different kinds of articificial light:
  1. Available light.  This is the artificial lighting used to illuminate streets, buildings and interiors like lamps.  We can refer to this as found lighting.
  2. Photographic lighting.  This is equipment that you buy to create a lighting effect.  We can think of this as deliberate lighting.
Available light can be found indoors and outdoors after dark.  There are 3 kinds:
  1. Tungsten - works by heating a filament until it glows like a domestic bulb for example.  They look orange or red in colour and photograph reddish. This can be prevented by changing the white balance in our cameras.
  2. Fluorescent - usually in the form of long tubes and can be found in supermarkets, offices and public places.  Although the light from these looks white it actually photographs greenish or yellowish.  This is because fluorescent lighting does not emit a full spectrum of colours. White balance can correct this.
  3. Vapour - usually street lighting, floodlights in sports stadiums.  Sodium lamps look yellow and photograph green/yellow and are easy to spot.  Mercury and multi-vapour look a slightly blueish white.

Exercise: Tungsten and fluorescent lighting

For this exercise I had to find a room lit by tungsten lighting and then wait until sunset. 

When I looked out the window for a minute at the fading daylight and then looked back in the room the light was a yellowy orange colour.  It took less than a minute for my eyes to adjust and when they had the room looked a normal colour perhaps with a hint of a yellow tinge. 

Looking back out at daylight, the sky looked very blue and darker. 

I measured various points in the room with the camera's light meter.  The shutter speeds were very slow for an aperture of f/9 varying from 1.3 secs to 2 secs for a normal average exposure using ISO 200.  With the shutter wide open at f/5.6 the shutter speed was 4secs for an average exposure.  This is much too slow for handheld. 

It demonstrates that tungsten light is not very strong which I would have expected because lamps are not very bright for reading and even bigger lights on the ceiling fail to distribute a bright even light across the room.  The centre of the room underneath the light is always brightest. 

I then had to take some pictures of the room where the interior and the window with the sunset outside were visible. 

WB Auto - The room looks a little yellow
WB Daylight - the room looks orange but the outside looks a little more realistic.


WB Incandescent - looks very similar to the Auto setting. Room has a yellowish ting but is more accurate than the daylight setting.


Part 2.  Fluorescent lighting

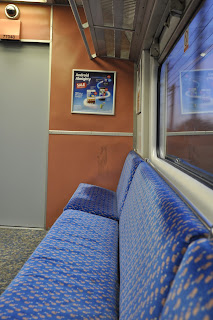
For the second part I had to find two different interiors lit with fluorescent lighting. I had to take two images of these scenes one with the WB set to auto and the other using Fluorescent.

Although not the most interesting shots, I chose a very white background so we could see the effect of the different white balances more clearly.  In the second shot I chose a colourful composition to see if the white balance had any effect on a range of colours.

WB Auto
There is a slight green tinge to the image. I captured a white wall so this tinge could be seen clearly.

WB - Fluorescent
The green tinge is gone.  The shot is warmer and more like the way my eyes saw the scene at the time.

WB - Auto
You can see the window frame is slightly green instead of a warm cream colour.  The pink wall in the background is also a bit yellowish.

WB - Fluorescent
You can see the green and yellow tinges have been corrected.  The blue of the seats is also brighter than the shot above.

Exercise: Cloudy weather and rain

For the first part of this exercise I had to photograph the same view in sunlight and under cloud with the white balance set to daylight.  

Sunny day - this imahge is warmer and the shadows and colours stronger

Cloudy and foggy morning


Sunny day

Cloudy day - I prefer this one as it makes the subject stand out more.

Sunny - all the shadows cast from the sunlight are clearer visible.

Cloudy day - this image is extremely flat in comparison and shows no movement.


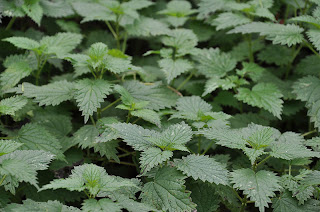
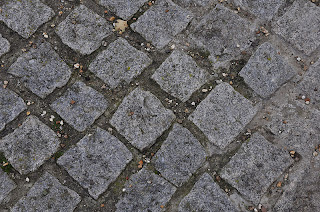
For the second part of this exercise, I needed to take three images outdoors on a cloudy, overcast day.  This had to include something with strong colour. 

I like the green colour of the nettles in this shot.  It is very vibrant and strong.

The dark day brings out the best in these paving stones.  You can also see where they've been wet from some rain which adds more character to the shot.

Red berries for my strong colour.  Without direct or harsh sunlight we get a more even distribution of colour that is richer.


For part three, I needed rain and something to stop my camera from getting wet!  That's of course if the weather would provide some rain. I prepared rain kit for my camera bag with a see through shower cap that you get in hotels to protect my camera and hood to try and keep the rain off my lens. 

Two weeks in and still no rain. So here are some images I took a couple of months ago in the rain in London.  When it rains again I will add some more shots to this blog.  Or maybe even a separate blog dedicated to RAIN!


The colours in the rain are more vibrant.  Shutter speed is slowed down by the rain which can lead to some interesting shots like the bike and bus above. 

I also the way the rain hitting the puddles has been captured in the first image. 

Lots to explore with in the rain!

Exercise: Variety with a low sun

This exercise demonstrates some of the advantages of shooting when the sun is low in the sky. 

During the winter the sun is lower in the sky that in the summer months. 

Frontal lighting
This is when the sun is behind you hitting your subject fully.  The lighting effect can be intense and the subject may reflect the sun. 


Side lighting
this is when the sun is to either side of the subject and about half of the image will be in the shadow, the other half lit. 


Back lighting
Taken towards the light.  Usually very little detail of the subject will be visible and therefore you will have a silhouette effect.


Edge lighting
This is when the shot is taken with the sun out of view of the frame but with the edge of the subject lit.  Note that rim lighting is different - it is an effect created where backlighting creates a rim of light around the subject like a halo which separates the subject from its surroundings.


There are lots of diferent lighting effects that can be created using the sun alone.  I think the easiest to find it back lighting which is something you tend to get when shooting interesting skies.  When you expose for the sky you tend to lose some or all of the foreground/landscape in the shot.  However, this type of lighting does really emphasise the shape of your subject and would be good for distinctive shapes like flowers and human silhouettes. 

Side lighting can give an interest feel to an image.  Depending on the strength of the light, side lighting can give more contrast to a shot and also make it less flat.  After all it is the shadows and highlights that give depth to a picture.

Edge lighting was difficult to get.  I don't think the image above is the best, but I do think it is a starting point.  I will look for more interesting and naturally occuring edge lighting siturations on sunny days.  Perhaps it would possible to achieve this effect by using flash or strobes. 


Thursday, 24 November 2011

Exercise: Light through the day

The aim of this exercise is to look at the way a view changes as the sun moves and the light changes.  Again as this is November in England it is difficult to find a very clear day to undertake this exercise.  I decided to opt to take these images over a series of days during periods where the day is clearer. 

During the time these scenes were photographed, sunrise was approximately 7.40am and sunset 4pm.

There is some cloud cover in the images.

All images shot at aperture f/11 (unless stated) and ISO 200

1/160s
 8am during the Golden Hour
The light has an orange/reddish hue to it.

1/250s
9am after the Golden Hour
There is a yellow hue and the scene is much brighter.
 
1/400s
10am
The scene is bright and there is still some shadow detail in the fence in the left foreground.

1/160s f/9
Midday
The light is pretty 'white' with little or no shadows to be seen but plenty of contrast. There is less drama in the scene.

1/160s
2pm

1/60s
3pm
The sky is very bright.

1/60s
3.15pm


1/60s
3.30pm
The scene is beginning to get darker as the sun is lower in the horizon.  The sun can still be seen shining on the left hand side of the building.

1/30s
3.45pm
The images are taking on a pale blue/violet hue probably due to the clouds.

1/20s
4pm
With the sun below the horizon we are entering twilight and there is a dark and blue hue to the image. The light can no longer be seen shining on the building.

This exercise demonstrates the effect the light has on a particular scene.  The weather and time of year have greatly affected my ability to capture a clear sky and sun which would illustrate the changes and effect of the light moreso. 

However, in saying that it is clear that there is more drama in the images taken around the golden hours whereas the images during the day with the white light makes for a harsh scene especially when it is a landscape. 

My favourite would have to be the images taken around sunset and sunrise.


Friday, 18 November 2011

The time of day

Dawn to dusk
It is common knowledge that the best times for shooting landscapes is at sunrise and sunset where the sun is low and the light brings out all the shadows and character in the scene. 

There isn't much as photographers that we can do about outdoor light only to wait for it to change or for a more desirable time of day to shoot.

Although most amateurs tend to take their images during the day, midday presents us with an unattractive light.  Because it is over-familiar it is not as special as the light at sunrise/sunset. 

The Golden hour is when the sun is near the horizon - before sunset or after sunrise - giving us an intense golden light to work with.

Exercise: Judging colour temperature 2

For this exercise I have to decide what correction a scene needs. 


The first part of this exercise would have produced better images if I had changed the white balance to Shade for the one in the shade or maybe taken it on Auto to make a comparison. 

Likewise seeing as the subject was a person I would have looked at using auto for the image where the sun is low on the horizon.  However, if this was a landscape I would have preferred to keep the yellowish hues. 

To look at ways in which adjusting the white balance can correct the image I have taken these images again using a different subject using the following settings:
  • Direct sunlight
  • Shade
  • Auto
I used a white bear as the subject for these  first shots due to a lack of volunteers.  Plus the teddy bear works well for Moose's infamous teddy bear exposure compensation test. 

Direct light


Shade

Auto

Thursday, 17 November 2011

White balance

The white balance feature on digital cameras deals with the differences in colour temperature.  This adjusts the overall colour in a scene so that the very brightest parts are captured as pure white and without a colour tinge from the light. 

The settings on my camera are:
  • Auto
  • Incandescent
  • Fluorescent
  • Direct sunlight
  • Flash
  • Cloudy
  • Shade
  • K - where you can set your own white balance.  This can be done by using a grey card. 

Wednesday, 16 November 2011

Exercise: Judging colour temperature 1

For this exercise I have to take 3 pictures of a friend in different daylight situations.  One in full sunlight during the middle of the day, one in shade during the middle of the day and one when the sun  is close to the horizon. 

For the best results I needed a clear day.  However, this is November and England and getting a day with any sunshine is a rare treat. 

All images were taken with the White Balance set to Daylight.


Full sunlight during the day
This image is very bright.   

Shade during the day
There is a blue hue to this image reflected from the light blue in the sky.  If the sky was bluer then this could be more noticeable.


Sun low in the horizon
The sun was not very bright for this shot but you can see a faint yellow hue in the shot. 

The colour of light

Sunlight is our natural source of light.  During the middle of the say it appears colourless - we refer to this as white light.  This is what we regard as normal light. 


Light becomes colour when a part of the spectrum is missing.  Daylight normally has two colour directions. On a good clear day, when the sun is lower in the sky it becomes yellow, then orange and if you have a good sunset red by the time it reaches the horizon.


The reason this happens is because all the particles in the atmosphere scatter some of the light and there is more atmosphere between us and the sun at sunset.  The blue wavelengths have been scattered leaving the yellow/orange colours to come through. 


On a sunny day in the shade the orange/yellow is scattered making the light coming from the sky blue.


The colours of daylight can be seen on a scale that runs from red to orange to straw-coloured to white and then blue.  This is called the colour temperature scale. The temperature is measured in degrees Kelvin.
Generally the cooler the Kelvin temperature the warmer the colour and the warmer the temperature the cooler the light.

Color Temperatures in kelvin units

Thursday, 3 November 2011

Exercise: Higher and lower sensitivity

This exercise required me to take shots at different ISO settings. 

Firstly I had to look for marginal situations and take one picture at normal ISO setting and then one at a higher ISO setting. 

I chose to take these pictures near sunset to make shooting conditions more challenging.

ISO 100
I was able to shoot at f9 with a shutter speed of 1/60s which is really the limit for handheld.

ISO 400
I was able to shoot at 1/250s at the same aperture by increasing the ISO which is apporx 4 times faster.

ISO 100
I shot this at a low aperture f5.6 with a shutter speed of 1/6s of a second which is too slow for handheld.  You can see the image is slighly blurred close up.

ISO 400
This allowed me to shoot at 1/20s at the same aperture without creating too much noise but making the pictures less blurred for handheld.

ISO 100
Again this was shot at f5.3 at 1/10s which blurred the motion of the car but also the blurred the buildings

ISO 400
I was able to shoot at 1/40s by increasing the ISO.

ISO 100
Shooting at a low aperture of f5.6 at 1/8s

ISO 400
I could shoot at 1/20s

ISO 100
shooting at f5.6 and 1/5s

ISO 400
Allowed me to increase the shutter speed to 1/20s

ISO 100
I was restricted to shooting at 1/15s which was too slow

ISO 400
I was able to shoot at 1/60s which is acceptable for handeld.

Shooting these marginal scenes in lower light proved troublesome handleld.  Increasing the ISO sensitivity allows you to increase the shutter speed which in some of the cases made for acceptable handheld shooting. 

In the other cases above I should have increased the ISO further still in order to get a less blurred image. 

When I looked at the images up close those shot at ISO 400 were a little noisier but not so much that it took away from the image.  Increasing the ISO above 400 to perhaps 800 might have made for a faster shutter speed to use but it may have compromised the image quality a little too much. 

My preference for shooting these kind of situations is to use a tripod to get the optimum.  However, I know that this is not always possible and this exercise shows the effect ISO sensitivity can have on difficult to achieve exposures.