Flash is a supplementary light, like your very own personal miniature sun, which fills in the detail your camera can't see. As we know the dynamic range of the camera is much lower than our own eyes' dynamic range.
Where does flash fit in the photographic triangle?
Aperture - a correct flash exposure relies 100% on aperture. If we dial in the aperture we want the flash will give us the correct flash-to-subject distance scale. This is the distance the light has to be from the subject in order to get a correct exposure using the aperture you have selected.
Shutter speed - determines how much ambient light appears in the picture usually -2 stops to let enough light through.
ISO - can be increased to make the camera more sensitive to light which will enable you to extend the range of your flash.
You can get weaker light by powering down the flash. This is helpful when the flash-to-subject distance is not practicable as in macro photography and also when you want a softer light on your subject.
High speed sync
Allows you to select faster shutter speeds. But there is a trade off as it reduces the power of your flash.
Fill light
You can use your flash as fill light on a bright day as your camera will have problems exposing all the highlights and shadows. This is particularly useful when shooting outdoor portraits.
Bounce flash
For softer light you can bounce your flash so the light hits the ceiling or a wall and then falls on your subject. This produces softer light. If you use a catchlight panel this produces a catch light in the subjects eyes and adds that little sparkle which makes a portrait.
Off camera flash
Taking your flash off the camera allows you to shape the light and get contrasting and interesting shots especially in portrait work.
Rear-Curtain Sync
Cameras focal plane shutters contain 2 curtains. The first opens when you press the shutter release button and the second curtain closes the shutter once the exposure has been recorded.
The flash usually fires when the first curtain is opened at the beginning of the exposure. Rear-curtain sync is when you set your camera so the flash fires when the second curtain is beginning to close. This enables you to capture a longer exposure where motion is involved.
Manual V TTL
TTL works on the premise of sending out a 'pre-flash' an infrared beam that strikes your intended subject and then travels back to your camera telling your camera's computer how much power is needed to create a correct exposure. This calculation is based on the camera's meter reading and as I found out when re-visiting exposure this reading doesn't always give you the results you want especially when working with blacks and whites.
In saying that TTL is brilliant when you don't have the time to set apertures and workout flash-to-subject distances for example in situations like photographing events and street photography.
I think for the moment I prefer working with manual opting for TTL when the flash is off camera. However, I am sure that will change once I start using my flash more.
Tuesday, 17 January 2012
Exercise: Concentrating Light
You can may light fall on just part of a scene and have the surrounds in shadow. This can be done by using a snoot. This adds drama to your shot and directs the viewers interest.
For this exercise I used a home-made snoot which I created using a black piece of card which I then attached to the flash head.
It took a little time at first to work out where the light was falling and which angles worked best. Here is my best picture:

For this exercise I used a home-made snoot which I created using a black piece of card which I then attached to the flash head.
It took a little time at first to work out where the light was falling and which angles worked best. Here is my best picture:

Wednesday, 14 December 2011
Exercise: The Lighting Angle
This exercise is all about seeing the effects of the light from different positions in relation to the object.
For this exercise I took a similar object and shot the following sequence:


I then had to take these shots with the light at a 45 degree angle from the object.


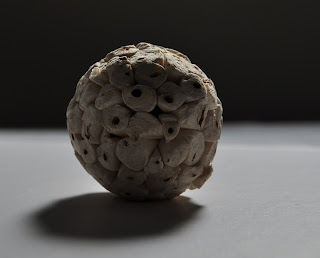
For this exercise I took a similar object and shot the following sequence:

Light to the side. The object is lit on one side with the other in shadow.

Light towards the back and to the side. The light falls on the edge of the object giving it shape.

Backlit - the shape of the object is clear from the silhouette.

Light directly on top. You can see the shadow underneath the object which is the same shape as the object.

Lighting on top and to the rear. The top of the object is lit with the bottom in shade. The shadow is a little harsh but it does give form to the object.

Lighting on top and to the front. Small shadow with all theobject lit. Less distracting shadow pattern.
I then had to take these shots with the light at a 45 degree angle from the object.

Side - casts more of a shadow and illuminates more of the object.

Front - shadow stretches further back.

Side and to the back

Backlit - you can see more of this than with the camera horizontal to the object.
The position that gives the best 3-dimensional effect is with the light on top or from the side. Shooting into the light or with the object front lit makes for a pretty flat image especially is the shadows are light.
I like the side lit shots with one side in shade and the other lit. It creates an interesting mood into an image.
Exercise: Softening the light
For this exercise I had to arrange a still life with an object or a group of objects. The lighting direction I chose was slightly to the side.
As I don't have any photographic lighting, I had to improvise for this exercise and I used a builders light. I used tracing paper as a diffuser.
The first shot was taken with the naked light.


As I don't have any photographic lighting, I had to improvise for this exercise and I used a builders light. I used tracing paper as a diffuser.
The first shot was taken with the naked light.

Using naked light you can see the darkness of the shadows. They are bigger in size than the actual objects. They have a sharp edge.

The shadows in comparison in this shot are much softer although still quite big they don't dominate the shot and take away from the objects. The edges are not as sharp.
Diffusing the light softens the shadows in your photographs. The size of the shadows in these shots is down to the angle of the light, but it does give a good example of how naked light at this angle can produce very distracting shadows.
I should also have adjusted the exposure to over-expose for the whitish background.
Thursday, 8 December 2011
Inverse Square Law
Understanding the Inverse Square Law (ISL) is essential to managing light in photography especially flash light. It deals with the falloff of light in relation to distance from flash to subject.
From a physics perspective ISL relates to any physical law stating that a specified physical quantity or strenght is inversely proportional to the square of the distance from the source of that physcial quantity.
In plain English, as flash-to-subject distance doubles the light reaching the subject is only 25% of the original light that left the flash. For example, you move your subject from 5 to 10 feet away from the light source, four times the amount of light is needed to get the same exposure at 10 feet that you get at 5.
Here are some calculations courtesy of Adorama TV.


At 16 feet away the falloff is not so noticeable and therefore we have a more evenly distributed light. This would allow us to take a portrait where some of the background would be visible and not blown out.


Understanding the effect falloff has on our images enables to explore different photpgraphic opportunities. The nearer our subject is to the light we are able to isolate them and get a high contrast look. The further away more background is captured and we have a softer look.
Falloff also has an effect on exposure and we may need to either move the subject to achieve a correct exposure or alter our aperture.
From a physics perspective ISL relates to any physical law stating that a specified physical quantity or strenght is inversely proportional to the square of the distance from the source of that physcial quantity.
In plain English, as flash-to-subject distance doubles the light reaching the subject is only 25% of the original light that left the flash. For example, you move your subject from 5 to 10 feet away from the light source, four times the amount of light is needed to get the same exposure at 10 feet that you get at 5.
Here are some calculations courtesy of Adorama TV.

As you see from above at 1' away from the light source you have full power of the light. When this light reaches 8' we only have 1/64 of the amount of light. The further away the subject is from the light source the less dramtic the light will be or the less falloff we'll have from the light source.
If we look at taking images of a white card at varying distances from our light source we can see the effect of falloff more clearly.
At one foot away the card looks like this and if this were a person we would have a high contrast portrait.

At 16 feet away the falloff is not so noticeable and therefore we have a more evenly distributed light. This would allow us to take a portrait where some of the background would be visible and not blown out.
The following chart shows how falloff progresses at various distances.

Understanding the effect falloff has on our images enables to explore different photpgraphic opportunities. The nearer our subject is to the light we are able to isolate them and get a high contrast look. The further away more background is captured and we have a softer look.
Falloff also has an effect on exposure and we may need to either move the subject to achieve a correct exposure or alter our aperture.
Photographic Lighting
There are different types of photographic lighting:
- Built-in flash. The built-in flash is pretty limiting with regards to using light creatively. It generally tends to produce very harsh images and for portraits gives, as Bryan Peterson calls it, a 'deer in headlights' shot of your subject. You can soften this light by placing a diffuser in from of the light which will help reduce the brightness of the light.
- Portable flash. Usually referred to as a speedlight. This is better than built in because you do a lot more with it. Depending on your flash head you should be able to swivel the head which allows you to direct the light and bounce it off the walls and ceilings for a softer and less harsh lighting effect. You can also use it off camera on a stand or handheld which will give you more interesting shots. In the notes for the course portable flashes are not rated very highly. However I think that is quite harsh. You only have to look at the work of Joe McNally and David Hobby to see how effective speedlights are.
 |
| Nikon Speedlight |
- Studio lighting - continuous. As the name suggests these are professional studio lights that stay on continuosly. These can be very easy and straighforward to use you just position them, turn them on and start shooting. Studio lights can overheat especially cheap ones. You will also need some form of diffuser. Using reflectors will help you create a second light effect by bouncing your continous light of a reflector positioned the other side of your subject.
- Studio flash. This is mains flash that plugs into the wall instead of your camera. The modelling light on a mains flash aids you in seeing the direction the flash light will take once triggered. These lights are generally more expensive and require a light meter (more expense) and wireless triggers. You will need to use some form of diffuser either and umbrella or a softbox. Softboxes have the benefit of containing the light giving you more control over it than with an umbrella.
 |
| Umbrella |
 |
| Softbox |
Exercise: Outdoors at night
I took the shots for this exercise in various city locations. For this exercise I had to include the following:


- a floodlit building
- a brightly lit store front
- a large interior with many people
- a raised view looking along a busy road.

Floodlit cathedral

Basement restaurant

All saints shop front - not the brightest but interesting!

Doorway
I found this shot interesting because although you can't see the door clearly the light gives it shape and and a sense of mystery.

Stratford Station just before rush hour
Shot was taken with WB - Fluorescent

Illuminated Shopfront

Westfields Shopping centre at night

The Christmas Lights

Trailing lights of a bus
Subscribe to:
Posts (Atom)